Showing posts with label E-PM2. Show all posts

Sunday, 8 June 2014

My personal settings for the Olympus E-PM2

I feel that one sweet feature of Olympus Interchangeable Lens Cameras is the MySet feature– it asllows you to set up several profiles and switch between them quickly as the situation changes. I evolve my preferences over the years and often forget why or what I have chosen. One thing that might improve the menus for me is if we could change the labels from MySet 1 to General Use or phrases like that.

MySet 1 – For general use

Feature Setting Rationale
Metering ESP ESP is an intelligent matrix pattern – and each model improves on this smart scene assessment of exposure.
Face Detect Off When pointing the camera at a crowds, the camera cannot know which face to give priority focus to.
AF Points Single. Centre I like shooting shallow DOF for tele and I like to choose which subject is more important for wide views.
Fn button assignment Magnify The E-PM2 does not have many Fn buttons to assign. So I use the only Fn button for LCD magnification when using manual focus lenses.
AEL / AFL S2/C2/M2 For S-AF – Press Half Way S-AFPress Fully lock exposure calculation and trigger the shutter
Record Button Starts Movie Recording
Full Time AF On
Back Dial Normal Operation

MySet 2 – For “Split Focus and Shutter Trigger buttons” – emphasise focus control

Feature Setting Rationale
Metering ESP
Face Detect Off When pointing the camera at a crowds, the camera cannot know which face to give priority focus to.
AF Points Single. Centre I like shooting shallow DOF for tele and I like to choose which subject is more important for wide views.
Fn button assignment Magnify The E-PM2 does not have many Fn buttons to assign. So I use the only Fn button for LCD magnification when using manual focus lenses.
AEL / AFL S3/C3/M3 For S-AF – Press Half Way – lock exposure calculation
Press Fully – trigger the shutter
Record Button AEL/AFL Initiates S-AF
Full Time AF Off I don’t want the camera to focus by itself.
Back Dial Locked

MySet 3 – For impromptu portraits

Feature Setting Rationale
Metering Centre Weighted I want to give the face exposure importance.
Face Detect Face and Eye Priority Sometimes I just want the camera to pick the face accurately, assuming I have only one subject.
AF Points Single. Centre I like shooting shallow DOF for portraits
Fn button assignment Magnify The E-PM2 does not have many Fn buttons to assign. So I use the only Fn button for LCD magnification when using manual focus lenses.
AEL / AFL S1/C1/M1 For S-AF – Press Half Way – lock exposure and initiate S-AF
Press Fully - trigger the shutter

Record Button Starts Movie Recording
Back Dial Normal Operation

MySet 4 – Monochrome – street scenes and portraits in general

Record Button
Feature Setting Rationale
Metering ESP
Face Detect Face and Eye Priority Sometimes I just want the camera to pick the face accurately, assuming I have only one subject.
AF Points Single. Centre I like shooting shallow DOF for tele and I like to choose which subject is more important for wide views.
Fn button assignment Magnify The E-PM2 does not have many Fn buttons to assign. So I use the only Fn button for LCD magnification when using manual focus lenses.
AEL / AFL S3/C3/M3 For S-AF – Press Half Way – lock exposure calculation
Press Fully – trigger the shutter
Record Button AEL/AFL Initiates S-AF
Back Dial Normal Operation
Picture Mode Monotone Sharpness +1
B&W Filter: Yellow
Curve Adjustment
-
   Shadows: 2 


If I had a MySet 5

For my manual focus Samyang 7.5mm fisheye, the enormous angle of view seems to fool the body Image Stabilisation – I must remember to set IS to Off and even then, set the IS Focal Length to 8mm. Watch out for some odd lenses – there may be some shutter shock coupled with the resonant vibration frequency of these lenses and using the back LCD, hands outstretched, I encounter image shake / blur even at fast shutter speeds of 1/200th sec. Having IS on confuses the issue – try it Off.

Saturday, 6 July 2013

Having fun with Fireworks

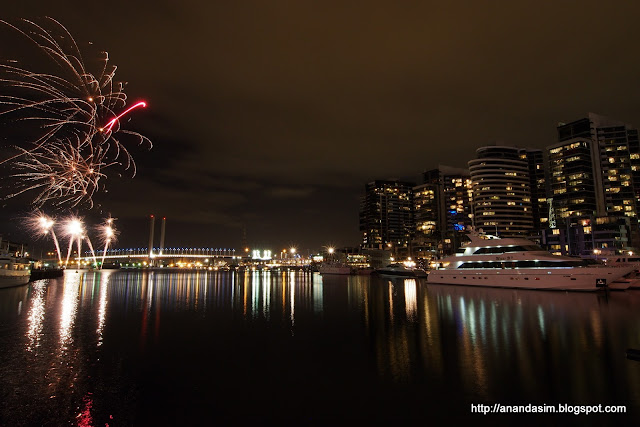
Coinciding with +City Of Melbourne What's On 's announcement of the Docklands Fireworks Season,  +Ockert Le Roux wrote a blog article to advise on techniques.  I missed the fun of last year with our gang and it wasn't raining yesterday so Ockert,  +Luster Lai and +Sophie Argiriou waited by the Cow In The Tree whilst I got myself in a standstill traffic jam at the end of Bourke Street.

I confess, I seldom do well at fireworks - it's a mental thing - Most defeated photographs happen in your head before you even press the trigger.. This time, I had a more positive outlook.

I started at f/11 but I moved onto f/22, the smallest aperture I could go, and the lowest ISO my camera could do -ISO 200, I didn't like bleached out trails and overwritten trails so on Ockert's advice of using a black masking board, I brought my Olympus polyprop environmentally friendly bag, tied the strings around the tripod head and laughed as I played peek-a-boo blacking out the scene between bursts. 

Oh and turned on Olympus's unique Live Time  - the feature that +Trey Ratcliff was asking for on his NEX

We could have gotten nearer. I could have swapped my DSLR 7-14 (used at 14mm) on the Olympus E-PM2 for the Panasonic 20mm prrime, to get more magnification. Even this is cropped a bit. But, hey, that event only takes like a few minutes and then it's over so what-the-heck, leave it alone. Let's set this one up for lots of negative space, shall we?

Does Live Time really help? It sure does. You can "see" when you are getting too many bursts superimposed and when the white trails which are so much brighter, are bleaching the scene so that you can end that frame and start a new one. 

But you must set the refresh frequency right. For this series of cameras, you can only refresh the LCD 24 times. If you set it at 2 secs refresh and you use a black mask in front of the lens to keep the exposure running but not take in more light, you could have the shutter open for way longer than 48 secs. (there is finite limit to the number of refreshes). Something like 4 secs at this fireworks density is about right - if you have more fireworks bursting per sec, then you may not hold the shutter open for that long).

And so, Enjoy!


Friday, 14 June 2013

Olympus LIVE TIME How-To

Updated: 13th July 2013

Live Bulb / Live Time - What is it?

With digital cameras, for dim scenes, you hold open the shutter and let the light stream through to the sensor. At some point in time, you decide that you have collected enough light so you close the shutter then, hit the Preview button so that you can expect the LCD for correct brightness of the image.

Live Bulb / Live Time enables you to peek at how the image is progressing so that you can decide when that the image is just right in terms of brightness so that you can close the shutter without wasting the current  shot and trying again. If there are light trails or variable motion in the scene, Live Bulb / Live Time allows you to examine the scene as you are waiting for the long exposure shot to complete - you can then continue or abort if something is not what you want, early.

Any modern digital camera should be able to do this, but most designers haven't got round to it. Live Bulb / Live Time was first implemented by Olympus on the E-M5/OM-D, then subsequently the E-PL5, E-PM2 and further models.

What is the difference between Live Bulb / Live Time ?

Live Bulb means you open the shutter by squeezing the shutter release button and hold it down until you want to close it. It's best to use a remote shutter release rather than press the button on the camera body as you might introduce handshake motion.

Live Time means you squeeze down on the shutter release button and can remove your hand. When you want to close the shutter, you squeeze again.

How do you get to the menu(s)?

  1. Set the camera to M - for Manual Exposure (that's the M in the P A S M dial / menu)
  2. Set the Shutter Speed slower and slower - as I change the setting on my E-PM2, it goes 1" then 2" then it continues to 60" - it then goes to LIVEBULB and then to LIVETIME - I prefer to use LIVETIME because I don't normally have a remote control and don't want to stand there holding down the shutter release button.

Optional Settings

Noise Reduction 

Setup . Gear . E (Exp/ISO) . Noise Reduction
I set this to OFF. This carries out Dark Frame Subtraction - if you expose for 20 seconds, the camera does that task and then shoots another exposure ignoring light for 20 seconds further - This Dark Frame represents the background noise of the sensor at that temperature. The camera then subtracts that noise from the real image and hopefully produces a cleaner JPEG. The issue is that if I shoot for 60 seconds, I can't use the camera for another 60 seconds. It does not affect your raw image file if you are shooting raw.

Live Bulb / Live Time display refresh frequency

Setup . Gear . E (Exp/ISO) . Live BULB 
or
Setup . Gear . E (Exp/ISO) . Live TIME

You can choose  between 0.5 seconds to 60 seconds.

The refresh display time does not affect the exposure of your final image, it just means that if you choose too brief a refresh time, you will not be able see the last moments of your shot. If you choose too long a refresh time, you may miss that crucial moment when the brightness for the image is just right - and cause a bleached out image.


IS0 100ISO 400ISO 800ISO 1600
Samples2419149
LiveTimeTotal VisibleTotal VisibleTotal VisibleTotal Visible
Intervals (secs)Time (secs)Time (secs)Time (secs)Time (secs)
0.5129.574.5
12419149
248382818
496765636
819215211272
15360285210135
30720570420270
6014401140840540

Let us work out a case for ISO 200, whatever you set, the display will only refresh for a maximum of 24 times. For half a second intervals, that means you can only see the screen refreshed for 12 seconds. For some fireworks, light painting or dimly lit cityscapes using ISO 200 f/16, you might need 30 seconds or even 60 seconds of light gathering. In that case you might consider 1, 2 or 4 second intervals. In a recent shoot, I found 2 seconds interval, worthwhile.

(One reason some of us are using f/16 is to accentuate the starburst of street lights and other point light sources.)

Live View Boost

Setup . Gear . D Display/Audio/PC . Live View Boost . On

Normally, I prefer my LCD or EVF to simulate exposure darkness / brightness display - this is one of the differences between an Optical View Finder in a DSLR and electronic displays in mirrorless cameras. However, for long exposures, at night /f16, the electronic display becomes so dark that you cannot see clearly. Set the Live View Boost to On so that the camera does not attempt to simulate real conditions - the display remains bright all the time during Liveview for you to carry out focussing, aiming, framing activities.

When you start the actual exposure, then it LiveTime works normally.

Manual Focus

Super Control Panel . MF

When you are shooting in the dark, the Auto Focus system may not stay steady at one focus plane or may fail to settle on the object that you want. You might want to set Focus Mode to Manual Focus - MF.

Image Stabilisation

Super Control Panel . IS - Off

When you are shooting on a long exposure, it is likely you will not be hand holding and be placing the camera on the tripod. Image Stabilisation instead of reducing handshake, may actually create sensor shake. Switch it off.

Want to see some videos demonstrating this feature? Click on YouTube Videos

Also see  Peter Mlekuž 's article

Navigate to the my Index of Olympus Camera Articles

Monday, 14 January 2013

Olympus Mirrorless Camera Settings–Studio Electronic Flash

Updated: 15th January 2013
Camera settings are very subjective. This is my current profile for Studio shooting with Manual Electronic Flash Exposure

Camera: Olympus PEN E-PM2 – OM-D has more buttons and dials so adjust to taste

Premise

Scenario: Studio Flash work without ambient light. All flashes on manual control. Camera on manual control.

I assume that exposure settings are dictated by controlling the studio flash lights, lighting setup. Use the camera to vary f/no and ISO

These settings are so that the camera does not hamper your flow.

Exposure

Exposure Mode Set “M” for Manual explicitly You have the option of buying a brace of automatic TTL exposure flash units and use the camera to interact and control the flash power that way. This scenario is about using manual flash units, non TTL controlled.
Shutter Speed 1/250th Reduce the effect of ambient light. Check whether the light is even and not cut off
+Paul Pavlinovich advises that if you use mixed triggering (radio & optical) on differing lights, you could run into issues where something slows the triggering. 1/125th is normally assumed to be comfortable shake reduced speed and the max for focal plane shutter models is not 1/250th.
f/no Initially f/8 Adjust to taste - your flash power, flash proximity mix, ambient light will affect your choice

These accessible via SCP

ISO 200 initially Use electronic flash to avoid going high ISO. Also reduces effect of ambient light. Can't go lower on this model of camera.
WB Flash WB  
Flash 1/64th Power (settable when no flash mounted) else Full (third party external flash mounted) Does not affect wireless flash trigger. Reduces the impact of the little kit flash if using optical triggering.
Sequential shots Single  
IS Off  
Focus S-AF Centre Spot  
Face and Eye Priority On  

Via MENU

A. AF/MF > Full time AF Off  
A. AF/MF > AEL/AFL > S-AF Mode 3 (AEL/AFL – S-AF)  
A. AF/MF > AEL/AFL > MF Mode 3 (AEL/AFL – S-AF)  
A. AF/MF > MF Assist On  
A. AF/MF > […] Set Home Single Point AF  
A. AF/MF > AF Illumination On For darkened studio. Off if the subject complains of the glare in their eyes.
B. Button/Dial > Button Function > Fn Function AEL/AFL  
B. Button/Dial > Button Function > Movie Button Test Picture Or Magnify if using non electronic lens  
B. Button/Dial > Button Function > Cursor Pad Buttons Off Assuming that Dial Lock is Off and set to f/no control.
B. Button/Dial > Button Function > Dial Function f/no  
B. Button/Dial > Button Function > Dial Lock Off To allow changing f/no conveniently – might be touchy
B. Button/Dial > Displ / Sound / PC > Live View Boost On When set to Manual Exposure, the viewfinder may go dark in a darkened studio
B. Button/Dial > Displ / Sound / PC > Shutter Release Beep On  

If you want to contribute any tips and ideas, happy to hear from you