Wednesday, 30 July 2008

Living with the 7-14mm UWA

Once in a while, someone comes by the Olympus DSLR forum on DPREVIEW and asks for any tips on the Olympus 7-14mm Zuiko Digital ultra wide angle (14mm - 28mm Equivalent Focal Length). I'm still on my learning journey, it's one of those journeys where the passage is as important as the destination. Here are some of my notes:

Know that there are two types of shots with this lens. - Exaggerated Perspective vs

Prim and Proper.

To ensure some rightness in the shot, you could

  • use a less wide focal length
  • use software to offset converging lines
  • hold the camera level.
  • a flat object, head on.

The lens at widest field of view, actually runs out of DOF (Depth of View) if you use the maximum aperture of f/4. This makes things blurry and give you the feeling of coke bottled zoom.

On the other hand, darkness helps cloak exaggeration and shallow DOF.

Tribute to YSL

del.icio.us Tags: ,,,

Just a shot

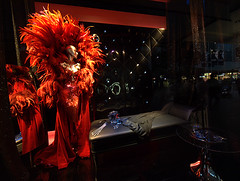
Haven't posted a shot for some time. Well, here's one then. Outside the Myer window, Bourke Street, Melbourne at night. Reminds me of the night terrors that Alan Shore (James Spader) is alleged to have in Boston Legal
Have you heard of night terrors?

Focus Blur GIMP Plugin

I was recently in a discussion about how small sensor cameras had an inherently large Depth of Field - and sometimes we do want to blur the background. I was referred to a paid product but for I also just found a free GIMP plugin.

The blur parameters seem extensive but it will take some nutting out - if I get anywhere, I'll post an entry.

del.icio.us Tags: ,

Monday, 28 July 2008

Understanding Color Spaces

Yes, I know Aussies spell it "Colour" but the web is full of US style spelling, so...

Raist3d says:

The problem with Adobe RGB is that most displays can't show you the colors, so what you get on screen is an approximation, and when you print it's the only time when you will really see more colors.

I would say "if you need to ask, use sRGB." If you shoot RAW, it doesn't matter as you can convert to sRGB or aRGB at will. If you use JPEG, then it's more difficult of a choice- I would say again, if you are printing and you can print proofs or such, then it may be worth looking into. But if you "need to ask" I would say go sRGB.

Excerpts from wikipedia (numbering by moi to aid clarity of reading)

  1. An RGB color space is any additive color space based on the RGB color model.
  2. An RGB color space can be easily understood by thinking of it as "all possible colors" that can be made from three colourants for red, green and blue.
  3. RGB is a convenient color model for computer graphics because the human visual system works in a way that is similar — though not quite identical — to an RGB color space. The most commonly used RGB color spaces are sRGB and Adobe RGB (which has a significantly larger gamut).
  4. As of 2007, sRGB is by far the most commonly used RGB color space, particularly in consumer grade digital cameras, HD video cameras, computer monitors and HDTVs, because it is considered adequate for most consumer applications. Having all devices use the same color space is convenient in that an image does not need to be converted from one color space to another before being displayed. However, sRGB's limited gamut leaves out many highly saturated colors that can be produced by printers or in film, and thus is not ideal for some high quality applications. The wider gamut Adobe RGB is being built into more medium-grade digital cameras, and is favored by many professional graphic artists for its larger gamut.
  5. sRGB is a standard RGB (Red Green Blue) color space created cooperatively by HP and Microsoft for use on monitors, printers, and the Internet.

    sRGB uses the ITU-R BT.709-5 primaries, the same as are used in studio monitors and HDTV,[1] and a transfer function (gamma curve) typical of CRTs. This specification allows sRGB to be directly displayed on typical monitors, a factor which greatly aided its acceptance.

  6. The sRGB color space has been endorsed by the W3C, Exif, Intel, Pantone, Corel, and many other industry players, and is well accepted and supported by Free Software such as GIMP, and is used in proprietary and open graphics file formats such as SVG.
  7. The Adobe RGB color space is an RGB color space developed by Adobe Systems in 1998. It was designed to encompass most of the colors achievable on CMYK color printers, but by using RGB primary colors on a device such as the computer display. The Adobe RGB color space encompasses roughly 50% of the visible colors specified by the Lab color space, improving upon the gamut of the sRGB color space primarily in cyan-greens.

Note: Not all web browsers are colour space aware. Safari and recently Firefox 3 can detect the different picture file metadata but even that can be a problem because the metadata may not be consistent with content.

del.icio.us Tags: ,,


Saturday, 26 July 2008

Warm feelings

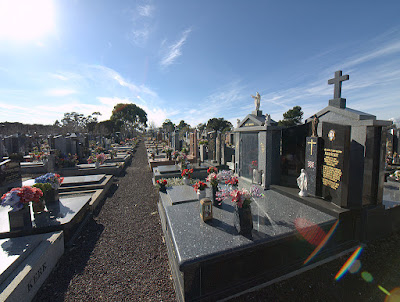
It's a few days past the anniversary of my Dad's passing away. I was passing the Keilor East Cemetery on the way to a client's office. I had the 7-14mm with me, just in case - Keilor is a place I frequent so it's an adventure going there, with the GPS.

In this shot, there is a contrail from a plane, the sun is actually in frame at the top left. I have another shot, more exaggerated because of the angle of this nearest gravestone. I like this better, even with the flare beauty spot.

I am looking for less exaggerated perspectives at 7mm (14mm EFL) and yet retain the width of view.

Wednesday, 23 July 2008

Point and Shoot Bridge Camera vs DSLR - Which One?

Updated and Revised: 30th June 2009

When Digital Cameras were new to the world, DSLRs were expensive to make. They could cost as much as an automobile. After the year 2000, new generations of cheaper, entry level DSLRs appeared. Recently, I have been speaking of a mother category for DSLRs called (Bigger Sensor) Interchangeable Lens Cameras (ILC). Because there are now several cameras that do not have a swinging reflex mirror mechanism and yet have a larger sensor and the lens is not fixed - you can take the lens off and fit another one. Originally called EVIL (Electronic Viewfinder Interchangeable Lens) cameras, Olympus in particular have broken the mould because their innovative PEN EP-1 does not even have an Electroniv Viewfinder. In addition, there are Bigger Sensor Non Interchangeable Cameras (BSNIC) - like the Sigma DP-1 and to some extent, the Panasonic LX-3.

All this evolution and diversity of shape and form in digital cameras is a sign that the industry is gaining some maturity.

What about the (Smaller Sensor) Non Interchangeable Lens Cameras (NILC)? They too have evolved. You can now find thin or small compacts with a 3x optical zoom lens, some, slightly bigger with a 5x zoom lens, some with a 10x zoom lens and then there are the traditional Digital Bridge Cameras - which have grown from a 10x zoom lens via 12x, 16x, 20x and up to 24x. In all this evolution, one category has been fading out, gradually. This is the 5x (or similar) zoom lens, non interchangeable camera with a bright f/no (f/2.8), good sensor quality, sometimes very robust and solid body (think of the Sony R1, the Olympus 8080). These have quietly disappeared from the marketplace, squeezed out by the bigger DSLR at one end, and the 24x ultrazoom on the other end.

If you are graduating from the smallest auto-everything compact camera and want to decide between a Bigger Sensor Interchangeable Lens Camera (which covers entry level DSLRs, EVILs and the PEN EP-1) vs a Smaller Sensor Non Interchangeable Lens Camera (formerly known as a Bridge Camera), there are cultural and technical issues to consider.

Buy an Interchangeable Lens Camera

  1. If you want the versatility to add more lenses later.
  2. If you want significantly faster response to snapping the photo after you click the shutter and faster speed of writing JPEG files to the memory card.
  3. If you know that the dollars you spend on the initial investment - the body and first lens, is only the start - there is more money to be spent eventually, in the lust for additional lenses.
  4. If, for the same price, you are happy that you get a so-so, limited range kit lens vs the best possible lens all-at-one-time permanently fitted on the Bridge Camera.
  5. If you want to shoot RAW, no buts.
  6. If you want better manual focus. Owners of film SLRs will be appalled by the small, dark optical viewfinders with no optical focussing aids in DSLRs.
  7. If you want a zoom ring (some Bridge Cameras do have a zoom ring).
  8. If you want the promise of better Image Quality - you have to supply the $$$, skill, extra time, patience and work though. See typical compact camera sharpness vs budget lens on dslr.
  9. If you want to shoot at least ISO 400, no buts.
  10. If you are willing to shoot at something other than Full Auto.
  11. If you want to more easily achieve shallower Depth of Field.
  12. If you want more Dynamic (Tonal) Range.
When you buy a DSLR, you are buying into a System. The value of the body will be ultimately less significant than the lenses you acquire. As a DSLR owner, it is likely you will get more lenses and subsequently retire your first DSLR body for another (or keep both)

    Buy a Bridge (Non Interchangeable Lens) Camera

    1. If you consider that the Interchangeable Lens Cameras are just sinks which will consume your money now and in the future.
    2. If even the smallest Interchangeable Lens Cameras look too big and too conspicuous to carry and use.
    3. If you have had a comparative look at the cost of the cheapest Interchangeable Lens Cameras with dark (f/4) kit lenses vs the brighter (f/2.8) lenses on Bridge Cameras.
    4. If you want all the bells and whistles right now, not much to add / spend in the future.
    5. If you want a 10x, 12x, 24x all-in-one zoom lens right now. There could be more curvilinear distortion, more purple fringing, softer looking images but you have this one lens that does a wide range of focal lengths.
    6. If you want Live View that responds to the shutter trigger quickly and prefer not to bring the camera to your eye and face - no buts.
    7. If you want to shoot movies as an easy option, often being able to automatically focus and being able to shoot without holding the camera to your face / eye.
    8. If you want a silent camera (you can switch off the simulated "click" sounds)
    9. If you want deeper Depth of Field easily.
    10. If you can bear slower response to the shutter clicking and longer "camera busy" times as the images are saved. Note that the Casio H series cameras are unusually and specially engineered to be speed demons.

    Do Consider

    • Buying one DSLR system and a Point and Shoot compact camera so you have power in one, portability and movies in another.

    Sunday, 20 July 2008

    The City after dark with the 7-14mm UWA

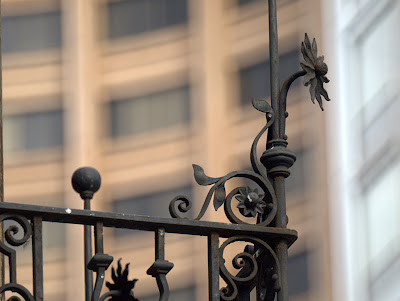
    The Zuiko Digital 7-14mm ultra wide angle is quite a distinctive lens. During the daytime, you need to think about how the 14mm EFL handles circles and converging lines close to you. At night, it's different.

    Have you heard of night terrors?

    People shoot the strangest things

    del.icio.us Tags: ,,,,,

    Thursday, 17 July 2008

    What is RAW?

    RAW is minimal or unprocessed sensor capture - this means it is as clean or upstream as possible, short of shooting the scene again.

    RAW is stored either uncompressed or compressed lossless. Therefore again, there are no artifacts caused by file compression in JPEG files

    A JPEG saved by the camera has compression, smarts from the firmware - processed for contrast mapping curve, saturation, sharpness, white balance adjustment, whatever shadow manipulation, lens aberration adjustment etc.... The JPEG is the photo after the maker's "secret recipe" has been applied, not before.

    JPEG is stored in 8 bit format. RAW files will be in higher than 8 bit. The number of tones and the dynamic range of RAW will be higher than JPEG.

    A RAW file will be larger than a JPEG file for the same camera. It will take longer to save, shot to shot. It will take up more space on the memory card. A RAW file will be smaller than a TIFF file if a TIFF file is possible on the same camera.

    A RAW file will of course be supported by the camera maker's software. And, eventually by other independent software makers. If the camera maker goes out of business or the maker's RAW convertor is neglected, then there is the risk that your RAW will not be readable by new software. You could try converting the RAW files, in batch, to Adobe DNG - hopefully that will gain popularity and become "permanent".

    When you edit RAW on the computer, what you perceive depends on the software you use. If you edit using the maker's software, the software will retrieve hints from the RAW file and try to emulate what a JPEG from the camera will look like. If you use third party software, that software may not retrieve any hints from the file. Thus, it will show you what the file really looks like. Unless you have in this software, applied a profile of how you want the file to look like.

    In any case, you view on the screen may or may not be hinted but the actual file is unprocessed. You then need to decide how the file should be output as a JPEG or a TIFF - if you don't make a judgement, then a decision has been made for you by how the software has been set up.

    As an artist, you don't give your RAW file to the client or whoever - because the RAW file is unfinished and you have not made a decision how the JPEG will look like. Mostly too, the consumer will not have the correct software to look at or print RAW in the way that you have decided it should look like.

    JPEG or TIFF is on the other hand, commonly understood to be the final product and when people open JPEG or TIFF in whatever software, they are looking at the final product, no buts.

    del.icio.us Tags: ,,

    Wednesday, 16 July 2008

    Which DSLR shall I buy?

    "Which DSLR shall I buy" is the most common question that newbies (from no experience or non DSLR Point and Shoot experience) ask. And very often, they want a camera that:

    1. has the best IQ (Image Quality)
    2. best prowess in shooting shots in low light
    3. can handle action / sports shots with ease

    Some of them read lab reviews and are totally confused after reading the reviews because the jargon and concepts mentioned are over their heads. Others revel on the minutae of numbers, throw-away remarks by reviewers and pixel peep at sample photos that reviews have taken over and over again so that cameras can be compared. The common problem these newbies have though is, they can't make up their mind. You feel real sympathy for them. Some, however, reject your sympathy. They may nominate a champion camera and start passionate and vindicative debates about how good that champion camera is against all others. Based just on reviews and reads - they haven't actually used the camera at all.

    There are now so many camera models being hawked as single lens package, dual lens package with overlaps in pricing by discounting older models, replacing the kit lens with a poorer quality one or adding a cheapie lens as a bonus, it's all purposely a mess to confound the buyer.

    So friend, how now? Here are my proposed answers.

    1. Do read the reviews. Not just from one site. Skim through the details if you find the jargon dizzying or tedious. Read the conclusions. Don't read between the lines too much - the reviewers are human - they have experience and wisdom as well as feet of clay.
    2. If you are like most newbies, you will have a budget. With that budget, you can eliminate several combinations immediately. If money is no object, then nominate whatever everyone says is the best and then go to the shop, hold that combination and ask yourself whether you want to carry that bulk, that amount of money on you when you shoot.
    3. With the remaining combinations, ask yourself about lenses. The camera body is one factor but really, I would want to enjoy my photography from day one, not hope that at the end of three years, I would have bought the lenses that I could afford. I really need some reasonable lenses right now, not in three years time.
    4. Choosing lenses can take you a while - size, weight, single or two to cover the zoom range, enough sharpness, bright enough to shoot indoors or whatever you want to shoot (action). Either choose lenses to buy now or make a lens buying plan and overview the total spend now and over time. One way to hit a price bracket is for either the camera maker or the camera shop to fit an excellent DSLR body with a cheapie lens that really really degrades the Image Quality of the photo. Think about that.
    5. Next, go feel the cameras and preferably with the lenses that you want, fitted. Holding the camera without the lens you want gives you false impressions. It is very important that the camera feels right in your hands. Words cannot describe how awful it is to spend good money and carry a camera that feels really bad - and this is subjective - something you can't read from reviews.
    6. After you leave the shop, think about the brand that you are buying into. In Australia, we have competitive cars from Ford, Holden (GMH), Toyota, Mitsubishi and the European makes. Yes certainly there are differences in car models but at the end of the day , I'll bet people buy the car because of the brand or brand illusion. The same with cameras. I've seen lots of conversations about features and technical merits but I am pretty sure, people buy the brand of the camera as much as the actual model. Each camera has the brand explicitly tattoed on the body - just like the Mercedes or Rolls Royce symbol.

    See, proposed answers are all about you. Because the ability to take a good shot is more about YOU than the camera.

    del.icio.us Tags: ,,,

    Tuesday, 15 July 2008

    The PASM thing

    Updated: 24th, July 2008

    Most serious photographers really jaded with trying to explain the four main exposure modes as well as the "green" full AUTO mode and the plethora of SCENE modes in these cameras. So newbie camera owners get pale and listless descriptions of what these modes do. Often, the question is "should I use P or A or S" for this scene or that trip - is one better than another? Well, here goes:

    Full AUTO mode - (often spelled AUTO and/or marked a special colour) - Use this mode when you can't or won't think about exposure and putting some human effort into choosing the right exposure. The camera will decide the exposure for you. Often, you can't adjust anything else, it's that automatic. Sometimes, you can set focussing to Manual still.

    SCENE modes - these are like full AUTO but the camera maker has thought out particular scenarios - shooting action shots, candle lit pictures, documents, landscapes and so on. Whilst full AUTO is a good "middle" adjustment of various parameters, each SCENE mode has been optimised for what that mode describes. Thus if you shoot bright snow or seaside scenes, Full AUTO may make the photo too bland (i.e. more gray) whilst picking a "Snowman" SCENE mode will bias the photo to record white snow.

    P is for balanced Program Mode. This is like full AUTO but you can adjust lightness, darkness (otherwise known as EV Compensation), Sharpening and so on. The camera will choose a shutter speed and aperture that is optimum - not too wide an aperture, so that it can give you balanced good sharpness and balanced deep Depth Of Field for the light you have, not too slow a shutter speed so that you can get hope to freeze some action and avoid handshake. Why use P instead of A or S? Because P varies two parameters instead of one parameter. This allows the camera to handle a wider range of light levels. For example, if you chose the a maximum aperture for A mode and the sun suddenly came out from behind the clouds, your camera would now have to react and hit fastest shutter speed to cope. If the fastest shutter speed was not enough, you've now got an overexposed photo. If it was on P, the camera would have the option of automatically reducing the aperture. Some DSLRs have Ps which is Program Shifting (You control the curve of EV vs (Shutter Speed x Aperture) combination. This allows the camera to recommend a balanced Aperture and Shutter Speed but if you feel that this combination is not what you like and you know that this combination is not the only one for the same light level, you could roll a thumbwheel and advise the camera to choose a faster shutter speed - the camera would accordingly change the aperture. So Ps is like using A or S with easy human supervision in case you want a different combination.

    A is for Aperture Priority Mode. This is my favourite exposure mode - the human chooses what Aperture to set and the camera calculates the corresponding shutter speed based on the light meter reading. So I can choose a wide aperture to push my shutter speed as high as it can go for that lighting (for action shots) or I can narrow aperture so that I get maximum Depth of Field. However, if the light changes quickly or if it is a high Dynamic Range scene and pointing the camera to another place suddenly changes what it sees, the Aperture I have chosen may not be wide enough or narrow enough to cope - the calculated shutter speed may be at the maximum limit of what the camera can do.

    S is for Shutter Speed Priority Mode. I set a Shutter Speed and the camera calculates the Aperture from the meter reading. This is useful if I have decided on a particular Shutter Speed, for example, a fast one, and despite lighting change, I want the camera to react by adjusting the Aperture. Or, if I purposely want a slow Shutter Speed so that I get a blur of flowing water or movement. I don't enjoy Shutter Speed Priority:

    1. If I choose an impossible Shutter Speed, then the light and the camera may not be able to react within the limit of Apertures that the lens has.
    2. If I choose too humble a Shutter Speed, whenever there is more light, I am not able to benefit by increasing the Shutter Speed because the camera is not in charge of Shutter Speed, it is in charge of Aperture size.

    M is for Manual Exposure. Don't confuse that with MF which is Manual Focus. The two are independent of each other. If you choose M, you are not really "going cold turkey" - the digital camera's meter is still functioning and it will recommend or signify in some way, whether your chosen combination of Shutter Speed and Aperture is deviates from what the meter recommends. However, in Manual Exposure mode, you can certainly ignore the camera's recommendations and most importantly, the camera cannot take control of exposure - you are firmly in control. Use Manual if you are sure the meter reading is / will be wrong (shooting a small moon image against a dark night sky) or when you think the meter will jump around and fluctuate wildly by your waving the camera around an unevenly bright scene.

    More importantly, PASM is not the end - it is the means to an end. Whether you used any of the PASM to get f/8 x 1/100th sec, somehow you and the camera got there.

    Further reading:

    Monday, 14 July 2008

    Some Memorable Portraits

    I chanced on the L.A. Times gallery of celebrity portraits - they had taken one shot from each article and there are 65 of them. One thing that works for me, is of course, they are famous faces. But each photo is artfully conceived. Some of them have been UpSaturated and Sharpened but the content, posing and context is really interesting.

    See Celebrities by the Times

    Sunday, 13 July 2008

    Epiphanies on Exposure

    The Pope is in Sydney, leading the celebration of World Youth Day. My epiphany doesn't relate to that event but what Kurt Petersen took the time to find out and tell us.

    Spot-Hi meters at ~215-220 on the histogram and is equivalent to Spot +2EV. Use this on something you want to be the brightest part of your photo.
    Spot meters at ~115-120 on the histogram
    Spot-Sh meters at ~15-20 on the histogram and is equivalent to Spot -3EV. Use this on something you want to be the darkest part of your photo.

    I knew what Spot Metering does - point the center of your viewfinder it at something and the camera reports the Exposure Value you set on your camera (or the camera sets for you) to make that subject's tone equivalent to 18% Gray (or was it 12% Gray? - doesn't matter, it's about Gray).

    By using Spot Metering in a Point and Shoot snapshot way, you get awful results - you may not be pointing at the correct area to make 18% Gray and you may be more concerned about not burning out the bright clouds or rendering some darker coloured ground object without noise rather than anything related a midtone.

    So, if you realise that you don't want things to be Gray is an ephiphany. You actually want the opposite - to render bright highlights and dark ground objects in a pleasant way with detail,  colour and not much image noise.

    That's where the ESP or "smart" biased averaging matrix comes in with these modern cameras. They detect all the tones in the metering areas and calculate a "middle" EV based an optimum chance of getting it right. But how do they do that? They don't know whether you want perfect cloud and sky tone at the expense of darkened ground, neither do they know you want the person's face or detail in grass in preference to the sky. The camera makers solve this by doing a lot of research on actual photos in the field, generating stats on scene types, metering patterns, capability of the recording sensor, people's choices in those photos and so on. So they come up with a "smart" calculation to recommend to the camera. That's the best they can do, but that is NOT YOU - You're the end of the line, the "moment of truth" - you and the scene and the camera are where it comes down to right at that moment you press the trigger.

    So ESP or "smart" biased averaging can and will be wrong at times.

    This is where Spot-Hi and Spot-Sh come in for the Olympus E-510. If you set the Spot-Hi to the Automatic Exposure Lock (AEL) button action, pressing the AEL button will activate Spot-Hi instead of ESP for that shot. You point it at a bright patch that you don't want to "burn" - for me, that's the clouds in the sky. You recompose and shoot. Sometimes, this will give a result similar to using the ESP pattern. Sometimes, it will darken the ground and give you a good sky tone. If you ensure that your ISO is as low as practically possible, i.e. ISO 100, then the amount of noise you generate by lifting the dark tones in post processing will be as low as possible.

    What about Spot-Hi? Well, there is only one AEL button on the E-510, so I dedicate the Fn button to MyMode-1 and in this MyMode, Fn invokes Spot-Sh. It won't work like the AEL button, but if I point the camera at a dark ground object and don't re-frame, just shoot, then I am pretty sure that this dark ground object will not be inky, unrescueable black.

    Below are some shots I've done using several approaches. They're at the Blackburn Lake area and are of fairly high Dynamic Range oppurtunities.

    What camera reviews are good for...

    I was participating in an internet photo forum and reflected on how camera reviews are now heavily referenced and / or bashed by camera fans. They also completely confuse newbie camera buyers with the level of technicalities compounded with often subjective off the cuff remarks by the reviewers.

    Here's my angle on camera reviews.

    1. Camera testing labs are generally well equipped and professionally staffed. Objective Lab test results allow us to compare the technical merits of two or more camera models.
    2. Lab Test Results objectively report the truth of the testing. However, as we are not optical specialists or physicists or photo metric specialists, the significance or superiority of one value vs another has to be interpreted using subjective and judgmental words by the reviewer. Therein lies one major issue.
      1. The reviewer must firstly explain the relative difference in the reading comparing the model under review with another model.
      2. Secondly, the reviewer often neglects to inform that "under field shooting conditions", the superiority of one model over another in that value is completely nullified by the variations in skill, environmental conditions - of course, he would neglect to inform of this, he is informing you of the test result - talking about shooting in the field is off topic, in a sense.
    3. Making small talk and spinning a story is how a journalist or a reviewer makes a review interesting. Remember journalists are taught to tell a story so that the reader is entertained - tables and charts already clearly report numbers - so the reviewer thinks his job is to make the review interesting. There will be affectations in language reflecting the writing background, the age and experience of the reviewer - all the subjective human features. Sometimes good writing makes us read a review from start to end and makes us come back for more reviews. In fact, we often look to a reviewer to provide some wisdom and subjectivity in the context of his shooting experience.

      This can lead to issues again. We may respond to the perceived tone and language of the reviewer - and either praise his experience and credibility or deprecate his skill in the (English) language and his phrasing.
    4. There are few absolutes when we shop. A particular camera model in a different country or a different time may be price and discount variances (hence affecting value), be more suited to certain tastes based on demographic, overall economic status of the area, availability, warranty service. So the "bang for buck" of one camera vs another varies - which affects the shopper.
    5. Handling in YOUR HANDS, your subjective perception when you use the camera to shoot, your reaction to the menus and buttons and ultimately your mind set when you shoot with that camera - that's something that cannot be reviewed by proxy - you have to experience it.
    6. There are sample to sample variations in gear. As well as wear and tear on gear loaned out to reviewers. Despite the best quality assurance in the world, if the reviewer received a dud, he will report dud results.
    7. A camera may be optimised for different things. Like improved shooting in the field. Shooting a certain type of subject or scene. These optimisations may unfairly affect the straight results in the lab.
    8. The reviewer may come from a traditionalist background or the exact opposite - never having used film cameras. The reviewer may be a keen enthusiast or may have been a full time professional photographer in his previous life. This affects his inclination for certain features - for example, the preference to have gear that blows up to full wall size posters vs the optimisation to display on 1080 16:9 flat panel screens.

    With this in mind, how should one take reviews?

    1. Do pick a professional camera gear website for technical lab reviews. Take reviews of cameras from computer websites and electronics websites with some detachment - you may have a reviewer who is a photographer at heart, but likely, that is not his main strength or his job.
    2. Don't get upset that a reviewer does not share your passion with the camera that you have just bought. You have chosen your camera based on a number of factors and in context of your perception and experience. The reviewer is probably not at all like you - doesn't think like you, doesn't have the same criteria and most importantly doesn't need to buy this camera - he may already have his own gear - and as the owner of his gear, he may be as passionate about his gear as you are about yours.
    3. Don't use a review to justify your decision about your camera purchase. You have already bought the camera, there is no reason why everyone in the world has to agree about the merits of your camera.
    4. Don't use the review or the reviewer as the basis for optimum operation of the camera. The reviewer did not intend to use that camera to take photos for his own enjoyment - he carried out the review because that is his job - he may or may not want to use that camera socially or personally. Once you have bought the camera and used it extensively for a while, you are now a bigger expert on that camera than the reviewer who spent a few hours, a few days, a few intermittent weeks with that camera.
    5. Do be aware of what the reviewer said, but don't let it inhibit you in your use of the camera. Whilst the reviewer, in the context of so many cameras he has seen, may suggest that such and such is not worth doing or this camera is less capable than another, he did not buy the camera himself - YOU DID. Therefore, you, because of your commitment may perform miracles or simply work hard enough with the camera that you CAN get the camera to do things that the reviewer was not motivated to do.
    del.icio.us Tags: ,,

    Thursday, 10 July 2008

    Explaining Depth of Field

    Whenever you read some material on Depth of Field and the related aspects of photography, Circle of Confusion, Aperture Size, f/number, Lens Focal Length and Sensor Size, it goes ok for a few paragraphs and suddenly you have this MEGO phenomenon take over. As more senior photographers try to explain this DOF to newbies, things soon get worse.

    If you can handle the equations and tables, then the following resources are good:

    • Wikipedia: Depth of Field
    • DOF Master: Depth of Field Calculator - also has links to interactive programs for Windows, PalmOS, iPhone, iTouch, web based tables.
    • Freeware DOF Calculator for PocketPC
    • Olympus Europe's hosted DOF Calculator (Pocket PC)
    • Justin Snodgrass has a video called Depth of Field Explained. It's not bad - it's a video so you can pause, rewind and repeat.
    • Photozone: Depth Of Field Calculator (Java applet)
      • Has a simple visual comparison of DOF at f/2.8, f/5.6, f/11.
      • Has a Java applet showing DOF and visual chart. You key in focal length, focussing distance, CoC

      The depth-of-field is dependent on the OBJECT MAGNIFICATION ON THE FILM and the chosen aperture at a specific focal length.

      Focal length affects perspective. See Photozone visual comparing 17mm, 35mm, 50mm, 100mm. Also read this discussion by P.A. van Walree

      Photozone DOF Confusion:

      COC [Circle of Confusion] is not a function of format.

      “But wait a minute,” you say, “why do some applets use format instead of sharpness?” These applets assume that in photography the subject will be framed the same regardless of format. In other words, to frame the subject from the same distance the larger format will need a longer focal length lens, or the smaller format will need to be moved further away from the subject (or vice-versa).

      Photozone DOF Preview has an interactive visual of how pressing the DOF preview looks like when your shooting aperture is less than you viewing aperture.

    DOF in the context of different digital sensor sizes

    DOF is not difficult to explain for one camera. It gets more complicated to explain when you compare a 35mm film camera against say a Four Thirds Sensor camera.

    1. For the same optical focal length lens on two different cameras, the lenses don't have a different DOF. The DOF is the same.
    2. Take a 100mm lens that would fit a 35mm film camera. Fit it on a film camera and then fit it on an Four Thirds Sensor camera. If the lens fits either, you still have a 100mm lens. Assume both cameras can shoot with the lens.
    3. But because the Four Thirds sensor is 2x smaller, it only sees half the image. That's why they call it a Crop Factor. Say you can see a face occupying the full frame on the film camera. With the Four Thirds sensor sensor, being smaller, you can only see the fellow's hair and eyes.
    4. What this means is you appear to be "closer" to the person even though you are standing at the same distance, same lens. But your camera is different. At this point, the DOF is the same.
    5. So, what happens? In order to get the full face into the picture, you have to use your legs and walk backwards.
    6. Now that you have walked backwards from the subject, you are not comparing apples to apples anymore. You are comparing the Four Thirds Sensor camera, standing further back vs the film camera standing nearer to the subject. You have changed your camera to subject distance.
    7. DOF is based on distance between you to the subject. So, yes, in this case the Four Thirds Sensor camera, appears to have a deeper DOF compared to the film camera. Not because the lens is different, not because the camera sensor size is different, but because you used your legs to walk back and you changed the distance to the subject.
    Updated 11th October 2008: Tamron visual simulation of DOF effects

    Sometimes, you take the other tack and just say - heck, here is a camera, let's go out and shoot and see.

    (Photo was shot using 250mm f/5.6 CAT lens mounted on a FourThirds sensor camera - Olympus E-510)

    (Photo was shot using 250mm f/5.6 CAT lens mounted on a FourThirds sensor camera - Olympus E-510)

    del.icio.us Tags: ,,

    Monday, 7 July 2008

    Photographic Terminology Part 2

    ETTR - Exposing To The Right - is about setting your exposure such that your histogram right toe touches but does not get chopped off by the vertical right axis of your histogram. This way, you capture the maximum amount of light that your digital sensor and in-camera electronics processing can take. This gives the highest Signal to Noise ratio for your photo.

    Above is a 2 MP Nikon 775 shot. The light was "right", you can see good grass colour, blue sky and clouds. Capturing a both sky and ground tones with this camera can be quite difficult - the sky usually gets burnt to white.

    Stu Maschwitz of the Prolost blog argues that there is no one blanket philosophy for exposure (dead link).  If your real scene is of such high dynamic range that it the histogram is so wide that it spans and exceeds both the left and the right axes, then, you're between a hard place and a rock. You either call it a day or come up with a James T. Kirk solution to the Kobayashi Maru.

    Luminous Landscape is a well known reference website for photographic detailers. They have an article on ETTR. Emil Martinec writes a scholarly discourse on Image Noise, Dynamic Range and Bit Depth in Digital SLRs - his webpage is at the University of Chicago.

    On the other hand, spotted at the DPREVIEW Sony forum ...

    Sunday, 6 July 2008

    How-To videos for newbies at HowCast

    Lots of people get a camera, search endlessly for the one with the best IQ. At the end of the day, though they think they shoot less well than some one else who posted on the forum. Here are some videos.

    Arranging Your Shot

    Getting Better Family Photos

    Getting Better Baby Photos

    Capturing Natural Landscapes

    I'm not keen on pet photos, but there you are:

    Responding to RAW

    In a forum discussion with Dr. DAF, I was making some points about choosing a RAW editor, for newbies. Here's the cleaned up text.
    By the way, shooting RAW vs JPEG - another long discourse (never ending because lots of strong minded people argue on each side of the camps). The most effective and recent advice was this:
    Shoot RAW if you don't shoot too many shots in a session. Cause you're gonna have to process them. Shoot JPEG if you shoot nearly a hundred or hundreds of shots per session. Because life's too short to spend processing each one. Of course, that does mean that your JPEGs must be spot on in exposure and white balance.
    There are several Windows RAW processing programs as well as all purpose programs that do reasonable work. Each one has a personality. Many of them have a "try before buy" facility. In addition, the camera brands also provide a cut down RAW processor as well as a more powerful extra cost processor.
    My current, pragmatic criteria for these programs, not in any order of importance:
    1. Can I understand how to drive the program with minimal flying hours?
    2. Can I get the effect I want with the minimum work?
    3. Can I "see" the program working either in effect preview or in actual processing. Sometimes, I click a button or move a slider, nothing seems to happen, I don't know whether the effect has been carried out, is being carried out or "see" the before and after result.
    4. Hew mech iz it? Can I run it easily on any of my machines in a fair-go, fair use policy? Maybe, could I run it off a USB stick?
    5. After all is said and done, if I have a benchmark JPEG of the same scene shot at the same time, can my RAW efforts with said program equal or better what the JPEG gives?
    6. Does it support my RAW? - RAW for each camera is not standardised. Adobe DNG is. Some cameras are so new, software doesn't know how to handle their RAW. If you are really keen on a particular program, one trick is to batch convert the RAW files to Adobe DNG file format (if the free Adobe DNG convertor is up to date) and then use that program to work with the Adobe DNG.
    del.icio.us Tags: ,,,

    Now, that's what I call zooming

    I was forum chatting with Bassy at the Kodak forum of DPreview and conversation turned to shooting with more than one camera. Click on the photo below (Olympus E-510 with 7-14mm lens at 14mm EFOV to take you to it's source at Photobucket and then hover over the red square, see the blue caption box labelled "ducks" to see the ducks (Olympus C-750uz with 1.7x TCON giving 612mm EFOV).

    ducks

    Saturday, 5 July 2008

    Travels with my wide angles

    It's not the best of times for other things, but I am with a plethora of wide angle lenses on different cameras - the first time I can say that I have such luxury. Today was a sunny, winter's day. Not a day to be gloomy or depressed. So off in the car, driving, to see what we can see. I stopped at Sienna Falls, a hole-in-the-ground rejuvenation of an old clay quarry (used for Boral Brick materials).

    The road really is that steep, it's not just the 7-14mm ZD lens showing off.

    Then, we went off to Box Hill to have some Vietnamese beef noodles in soup (tendons) and broken rice. I paused briefly at the top and shot down into Carrington Road

    Friday, 4 July 2008

    Photographic Terminology Part 1

    It's an interesting time for participating in web forums on photography, equipment and taking photos. Newbies and seasoned photographers often scratch their head when they read abbreviations or terms in forum posts. I'll try to keep a record of the various abbreviations.

    Abbreviation Elucidation
    AOV In photography, angle of view describes the angular extent of a given scene that is imaged by a camera. It parallels, and may be used interchangeably with, the more general visual term field of view. (Wikipedia)

    See:
    Bernd Harlos's interactive demonstration (specific to the Four Thirds sensor size), Tamron's interactive Focal Length Comparison and the Contra-zoom aka dolly zoom animation from Wikipedia
    FOV The field of view (also field of vision) is the angular extent of the observable world that is seen at any given moment. (Wikipedia)
    Digital Sensor Crop Factor vs FF (35mm Full Frame) In 1913, Oskar Barnack developed the prototype Leica camera around the 24x36mm film size. This became the standard film size 35mm film SLRs. When the Digital DSLR was invented, it was a different medium and it was expensive to make such a large sensor. So different brands used as a basis, a smaller sensors.

    When you take any lens and fit it on a camera successfully, that camera's true optical focal length(s). Let us take for example, 50mm on a 35mm film camera. Now, for the Four Thirds consortium, their reference sensor is not 24x36mm, it is 13.5x18mm. Even if the lens displays a large area, the sensor only sees a smaller rectangle of it, the rest of the image is "wasted". Put it simply, it's like taking masking paper and cropping away the "unseen" area. This crop factor for Four Thirds is 2x.

    Take 2 people. Stand away from them with a film camera and the 50mm lens. You take a photo of 2 people. Take that same lens, same scene, but mount the lens on a Four Thirds camera. You will see 1 person in the photo. It feels to you that you are magnifying the scene by 2x. If you walk backwards a bit, you can fit both people into the photo, but you will have now changed your distance and your perspective.

    Since longer lenses magnify things, it appears that this real 50mm lens when mounted on a Four Thirds camera works like a 100mm lens in terms of AOV.

    Thursday, 3 July 2008

    Back at blogger

    I started my blogging at Blogger, oh so long ago, before Google took over. I've been on Live Spaces for a long time, but I'm re-discovering Blogger and Blogspot.

    I suppose some kum (gold) for launching a blog is auspicious?

    Hiding

    Shot with my legacy Vivitar 90mm f/2.8 Minolta MD Mount manual focus lens (actually my bro's), stopped down, mounted on the Olympus E-510 via Live View (one of the few times I did use  Live View). Tripod mounted of course, in natural light, golden winter light in the morning, streaming through the sliding glass doors.

    del.icio.us Tags: ,,,