Prelims
I had a fun time with some cool newcomers to serious photography and two long time friends, arranged by Victor last evening. It's provided enough impetus to break my drought of writing on this blog - Google+ has been so absorbing that most times, that +Mike Elgan once predicted, it would sap away efforts to keep traditional blogs going.
Fundamentals
So, opening with fundamentals. But not so much about Photography as Stuff about Life.
- I use the phrase Serious Photography to mean photography where you take the time and effort to get set up the camera, control the photo result rather than let the modern camera or camera phone do its thang - I don't use it to mean Stuffed Shirt, Stiff Collar Photography or approaches to it. As I said to the group before the meeting, I've become quite irreverent these days.
- There's often more than one way to do a thing, There's often more than one technique, camera brand, camera, lens, software product. What matters is the result - viewers of your images often see the product, the result, not how you did it. There will always be some dude to can pick the spots off a white wall, but don't let that dude spoil your satisfaction. Put some distance between yourself and those dudes.
- Don't Sweat The Small Stuff - What matters is context and relative degrees of good and bad. For example, if someone tells you not to use f/22 because it loses sharpness and resolution, yes, that can be true but that doesn't mean you can't give it a burl or suck it and see yourself.
- You've got to go out into the field and do it yourself. Reading information only, can be boring but more importantly can bullshit brains.
Camera Exposure Modes
On most cameras, there are the following:
- Green Auto or Auto or iAuto
- Scene Modes - Like Landscape, Night Scenes, Fireworks
- P / A / S / M or in Canon speak P / Av / Tv / M
Some people deprecate the Green Auto or Scene Modes and some obsessives want to eradicate that from all cameras - or often say "I'd give X dollars for a camera that doesn't have automatic modes". Should you use them? Or more importantly, Can you use them without the terrible burden of guilt?
Look. You paid money for the camera. And the camera has those features. If you want to use it for whatever reason, go ahead - it's not a betrayal or cowardice. Green Auto / Auto / iAuto is a brains off mode. You don't have to think. You could be on a blissful high and you don't want to spoil the moment with logical setup and thought. You could be real brain tired but still want to take the shot.
Bear in mind though
- some cameras automatically pop up that built in flash if the light is dim, making you look silly and spoiling the natural light nuances
- you may not be able to tweak the brightness of the shot. If you can tweak the brightness, the camera does not remember your choice for long so that it's not stuck in a rut.
- the camera saves only JPEG, not raw image files.
- you can't tune the shot to a somewhat blurred background, emphasizing the person in the portrait.
On some cameras, iAuto means the camera analyses the scene to figure out whether you're taking a photo of landscape or a person portrait or sports moving action. It's major innovation and it's getting better all the time as the cameras get more complex brains. But. If the scene light or the camera and lens body capability can't make a good photo, sheer camera intelligence can't overcome that.
Scene Modes
When you use Scene Modes, you are telling the camera the type if scene it is. in targeting the type of scene. They're sets of camera settings biased towards for example, landscape (sharp distant scenery, lush greens), person portraits, night scenes (increased ISO, fastest shutter speed given the dim light, largest f/no). Some people have so much success with Scene Modes that they want to reverse engineer the Scene Mode settings so that they can use it in M (Manual) or P A S modes. And get upset that the manufacturer does not document the secret recipe to each mode. Shrug - they're a secret recipe.
P / A / S / M Exposure Modes
| Symbol | Canon Symbol | Officially | What it means | Exposure Compensation | Additional Remarks |
| P | P | Programmed optimisation | Camera chooses f/no and shutter speed | You can darken/lighten the image brightness using the Exposure Compensation dial - the chosen pair of f/no and shutter speed will change. | Ps - Program Shift is available - this allows the user to bias the Programmed choice towards a different recommendation of f/no and shutter speed, while keeping the image brightness the same. If using Auto ISO, this is one more factor the camera can adjust by itself |
| A | Av | Aperture Priority | You choose f/no, camera chooses shutter speed | You can darken/lighten the image brightness using the Exposure Compensation dial - the camera cannot change the f/no so it changes the shutter speed | If ISO is set to Auto, this is one more factor the camera can adjust by itself |
| S | Tv | Shutter Priority | You choose shutter speed, camera chooses f/no | You can darken/lighten the image brightness using the Exposure Compensation dial - the camera cannot change the shutter speed so it changes the f/no | If ISO is set to Auto, this is one more factor the camera can adjust by itself |
| M | M | Manual Exposure | You choose both f/no and shutter speed | Usually not meaningful | Be alert to the use of Auto ISO - on various cameras, this overrides full control image brightness since the camera can vary the ISO |
But which exposure mode one should you use? What do I use?
Use P when you aren't too concerned about whether a shot has extreme background blur (subject isolation) or motion stopping. Fans of P often say they can twirl a dial and get Ps - Program Shift - that is, bias the choice towards a a certain f/no or a certain shutter speed.Use A when you tend to be concerned with landscapes, architecture, sunsets or person portraits. You directly set the f/no which controls Depth of Field.
Use S when you tend to be concerned with freezing moving subjects (sports etc...) or when you want to nominate a shutter speed that is really slow for smooth blurred waterfalls.
Use M with fixed ISO when you feel the camera's prediction is frequently confused. This could be that you're taking a photo of the moon and the camera doesn't understand. Or you taking photos of unevenly lit, dramatic scenes - as actor moves between spotlight and darkness, the camera doesn't get it either and always recommends wrong. One feature of modern cameras is that you have Liveview - either LCD on the back of the camera or Electronic View Finder. This makes M more easy to visualise - with emulation of scene brightness in Liveview, you can just point and twirl your f/no and/or shutter speed and/or ISO and you get a preview of the scene brightness before you click.
Let's take an analogy. Let's say you drive to work and you take a certain route. How did you come to pick up the route? Was it because it is the shortest? Was it because it is the cheapest (no road tolls)? Was it because you could do a pickup of the your partner or child along the way?
You can see that I'm heading the way that choice of Exposure Mode is a personal choice. For old timers choice depends on old habits. For example, in my days in the film era, the Minolta XE-1 only had A. There's also the facet that some have enough mindfulness to flex between Aperture Priority (when they want the emphasis on Depth of Field) and Shutter Priority (when they want to choose a shutter speed that is simply freezes motion). I don't enjoy that swapping and mostly stay on Aperture Priority because I don't have to deal with a different technique.
Whether you use P A S or M in the end, doesn't really matter if you can spot the challenge and get the shot successfully - the image file does not care about P A S or M. For most instances, you can make the shot regardless of whether you use P A S or M.
Parameters, Constraints - Managing and controlling them
P A S assist you in choosing parameters to achieve an image of relevant brightness - and clarity. Over time, you may want artistic renditions, conveying a sense of motion or subject isolation or sharpness or blur.1. The Shutter Speed Parameter
Photography is about taking a moment in time, sampling the light from the scene and capturing it onto film or digital sensor. The moment in time is gated by the shutter speed. The shutter opens, light comes onto the sensor, then the shutter closes and the shot is captured. The Shutter Speed numbers run like 25 or 100 or 500 or 1000 - that's for simplicity of camera display - they are actually 1/25 or 1/1000 of a second. Each shutter speed, for example 1/100 sec, is designed to be the same across all cameras.The Shutter Speed range runs into several constraints:
- There is a fastest speed limit each camera can do. For example 1/2000 of a second.
- There is slowest speed limit each camera can do. Maybe a few seconds. You may choose B which stands for Bulb - an old term - meaning the shutter will only close when you release pressure on the Shutter Release Button.
- For cameras with Focal Plane shutters there is a flash sync speed ceiling. Above that ceiling - called flash sync speed, photos with electronic flash will have parts blacked off.
2. The F/no (mostly known as the f/stop) Parameter
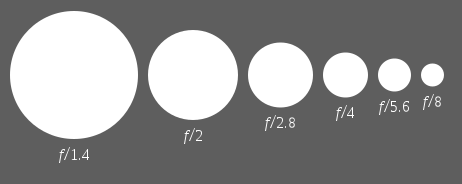
(image "Aperture diagram" by Cbuckley at the English language Wikipedia.)
Notice that the camera shows these numbers as 2 or 8 when it is actually f/2 or f/8. Unlike the Shutter Speed where you have the numbers progress in a doubling, the f/no scale is best committed to memory instead of doing arithmetic in your head. A certain f/no for example, f/8 is designed to be similar across all lenses. (If someone tells you about the t stop, don't obsess over it)
The f/stop range hits the following constraints.
- the smallest f/no is a optical, weight, size, cost limit. If your lens is not very expensive, it may have a brightest of f/4 - and for inexpensive zooms, as you zoom in, the brightest f/no will reduce in brightness to f/5.6 or darker.
- the biggest f/no might be f/16 or f/22 - at this extreme, the aperture can be so small that edge diffraction effects happen - this reduces sharpness in the image. Don't obsess over this or anything else - sometimes you do want edge diffraction for sunburst effects in #chasingthesun. Know about it, but don't obsess about it. Try it once in a while.
- In terms of detail and sharpness, there is a sweet spot for a certain lens (or several sweet spots if the lens zooms). It's worth bearing in mind but don't obsess over it and avoid the wide open f/no.

3. The ISO parameter
In photography we have abbreviated the term ISO 12232:2006 Photography -- Digital still cameras -- Determination of exposure index, ISO speed ratings, standard output sensitivity, and recommended exposure index to "ISO". By this, we mean we have a scale across all digital cameras (regardless of size) that we can refer to, as to how sensitive the sensor is to light. For example, ISO 200 should be the same across all cameras so my camera, when set to ISO 200 will deliver the same image brightness as your camera for the same scene.Digital Sensors are designed with a native ISO - the one on my camera is ISO 200. To allow the camera to offer a faster shutter speed and larger f/no even in dim light, the camera can amplify the sensitivity to 400, 800, 1600, 64000 and even higher. Extreme amplifications lead to increased digital noise (graininess in the image). Film, being based on photo chemistry was easy to make insensitive - we could have film that was ISO 25 or 32. Some digital sensors don't start so low, so manufacturers sometimes have a setting called Low which is a notch lower than the sensor's base sensitivity.
4. The Scene Exposure Value - is it a Constraint or Parameter?
You'll see references to the Exposure Triangle on the web. The three corners of the Triangle are of course Shutter Speed, F/No and ISO. I tend to say that a Triangle is missing one more axis. I prefer to call it a pyramid - the fourth tip of the triangular pyramid is Scene Exposure Value.Normally, if we arrive at an outdoor scene, we have to accept the scene's actual brightness. So that's a constraint - i.e it could be a bright summer daylight scene (that's coded as EV 15 @ ISO 100) or an evening sunset scene (that's coded as EV 12 @ ISO 1OO).
Scene Light is something we accept as a Constraint. We could come back another time, or change our subject position relative to the sun - in which case it's a Parameter we can change. Some keen photographers carry strobe lights and fabric lighting modifiers to exercise control of light in person portrait shooting. Others carry graduated or full Neutral Density Filters. 2011 to 2014 showed a strong trend / fad to High Dynamic Range (HDR) techniques - taking a bracket of 3 or more shots of darker, middle, brighter shots and blending them on the computer in post process. Thankfully the fad of extreme toning is subsiding....
Why it's a Constraint
- If the scene is dark, (like EV 12 @ ISO 100) you can't attain the image brightness you want if you use f/8 and 1/1000 sec and ISO 200
- If the scene is bright (like EV 16 @ ISO 100) you can't attain the image brightness you want if you use f/8 10 secs and ISO 200.
Counting Stops / Twirling Dials
In this day and age with the ability to chimp on the DSLR LCD after the shot, or to preview before the shot (particularly in compact system cameras a.k.a. mirrorless) - you don't have to walk around with sheets of tables, cardboard circular calculators or separate hand held exposure meters. You could, but you don't have to.What most people do is to use the power of being able to see the brightness and other characteristics of the image in the preview/review and twirl the dials in the right direction with confidence.
What's the right direction?
The most important thing to know is which end is low and which end is high. The second thing to know is how much to change - a third of a "stop" ? a full stop? more? Let's look an example scene and the scales.1. The table below has several rows. Don't read any significance to the vertical arrangement of the cells - the table is to demonstrate the row wise adjustments.
2. Assume we have a Scene EV of 14 - that's a daylight hazy scene with soft shadows.
How To Play
- If we move the yellow box of the Scene EV to left by one cell, we have to move one of the yellow boxes on the other rows left one cell as well to maintain brightness.
- If we want to darken the image (using fixed ISO), we can move the yellow cell in Exposure Compensation (the purple row) to the left, for P A S Exposure Modes. For M Exposure Mode, the purple row does not operate and we have to move the yellow cell to the left in one of the other white rows.
| Scene EV | dark | 11 | 12 | 13 | 14 | 15 | 16 | bright |
| Image / EV Comp | darken | -2.0 | -1.0 | 0.0 | 1.0 | 2.0 | lighten | |
| ISO | clear | 100 | 200 | 400 | 800 | 1600 | 3200 | grainy |
| Shutter Speed | freeze | 60 | 125 | 250 | 500 | 1000 | 30 | blur |
| f/no | deep depth of field | 4 | 5.6 | 8 | 11 | 16 | 2.8 | shallow depth of field |
Further Topics to write about
- JPEG vs raw or both
- Should you / Do you need to post process your shots on the camera?
No comments:
Post a Comment